Planning a Route
We use the following nomenclature: a "Route" is a sequence of connected "Waypoints" where you intend to go. A "Mark" is a waypoint that is not part of any route (marks and waypoints are really the same thing). A "Track" is where you have actually been, as recorded by the GPS.
To plan your route on the map, click the “New Route” toolbar button  and click on the map at the start-point of your route. Then click once for each intermediate waypoint, and double-click to end the route. The total length of your route is displayed on the status bar at the bottom of the screen as your create the route.
To scroll the map while you are creating a route, if you have a mouse with a wheel, you can click and drag with the wheel instead of the left button. If you don't have a mouse with a wheel, hold down the shift key while you click and drag, or use the cursor keys.
You can change maps while creating or editing a route, too. Just right-click as normal and select a larger, smaller or same scale map.
Double-click on the route (not on one of the waypoints) to display the details of your route in a tabular form. You can give your route a meaningful name.
Double clicking on one of the waypoints shows the details of the waypoint. In this form, you can change the name, edit the lat and long to an exact known position, change the waypoint icon, and turn on and off the display of the waypoint name on the map.
If you want to use Grid Coordinates instead of Lat and Long, use the Mode / Position Format menu command to select the coordinate system you prefer.
You can use the mouse to select and drag on-screen object such as waypoints and marks. Once you have created a route, try dragging one of your waypoints. Notice how the route, and the waypoint you selected are highlighted.
You can Lock the route, or just a waypoint using the properties form or the popup menu. Since it is easy to drag a waypoint, you might drag one accidentally, especially when under way. Locking prevents you accidentally changing the route or waypoint, and is highly recommended.
Try right-clicking on a waypoint. A pop-up menu gives you a number of options for editing the route, such as adding or deleting a waypoint. A different pop-up menu appears when you right-click on a route away from the waypoints.
There are some keyboard commands, as well: try selecting a waypoint and hitting the Insert key on the keyboard. Now try the Delete key.
You can re-use the same waypoint in more than one route. For example if you plan different routes all starting at your harbor breakwater entrance, they can start at the same waypoint. When you download your routes to the GPS, that waypoint can be displayed on the GPS with a meaningful name. To re-use a waypoint, just click on an existing waypoint while you are creating or adding to a route.
Displaying route properties
If you double-click on the route (on one of the lines between waypoints), the route properties dialog box is displayed. This allows you to name the route, and see the total distance, and a table of waypoints with their position and the course and distance between waypoints. If elevation data is available, the total vertical ascent and descent is also shown. The estimated time for the route is based on an average horizontal speed, plus an allowance for the ascent and decent. The default parameters are for typical hiking conditions. You can change the assumptions by clicking the Settings button.
Displaying the terrain elevation profile
To display the elevation profile, right-click on the route and select Profile.
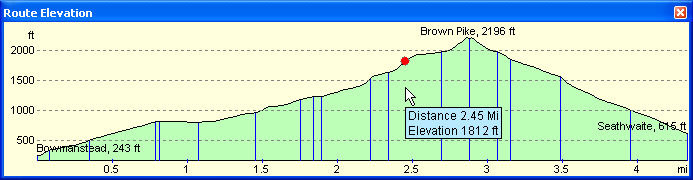
The vertical lines indicate the location of your waypoints. As you move the cursor across the profile window, a red dot on the map is synchronized with the red dot on the profile, allowing you to easily cross-reference the profile with the map. The distance from the start and the height at that point is also displayed at the cursor.
Right-click in the profile window to get a pop-up menu, which allows you to print the window, turn off the horizontal and vertical axes labels, and control the scale.
When "Auto scale" is enabled, the graph is scaled to fit the height of the window, and the vertical axis is labelled automatically. When you are comparing the profile of different routes, it is better to use a fixed vertical scale. With the auto-scale turned on, adjust the size of the window to get the vertical scale you want, then turn off auto-scale. Then close the elevation window. Now, all elevation profiles you bring up will use the same vertical scale.
Programming a handheld GPS
The recommended way to transfer a planned route to a GPS, smartphone or other device is using the industry-standard GPX file.