Note: Memory-Map Ordnance Survey Editions do not support the creation or use of self-scanned maps.
Commercially available maps are reliable and inexpensive. Scanning your own maps will involve a considerable amount of time and effort, and the clarity and accuracy of the result may not be as good.
However, you can scan your own maps and load them into Memory-Map navigator, as follows.
Scan the map image, and determine reference points.
Give the map a name, add search keywords, a copyright notice, and other meta-data.
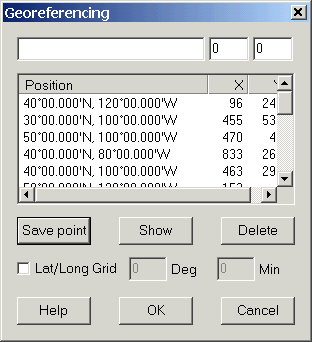
Add calibration points to associate the X,Y coordinates in the image with geographic positions on the earth.
Add a boundary polygon so MMNav knows the geographic area covered by the map.
Scan the map image and save it as a 4 or 8 bit indexed color (16 or 256 color) TIFF or PNG format image. A full color RGB image cannot be used. The map should be free from distortion and discontinuities.
Determine the latitude and longitude or grid coordinates of at least three points that you can identify accurately on the map. For large scale maps, (1:100k or larger) five points gives good results. For smaller scales, where the lines of latitude and longitude are not straight and parallel, more points are required. For example, you can
Use the grid lines printed on the map, or known corner locations.
Use another map that covers the same area, and is already calibrated.
Take a GPS out in the field and measure the position of some recognizable features. This is the most accurate method, but it requires you to actually be there, and takes the most time.
Run MMNav, click Maps, Refresh Map List, and Add the folder containing your image file. Click OK, OK
Select your image file in the list, and click the Edit button.
Enter the name of the map, and any other relevant data.
Click OK to save your changes.
Double click your image file in the Map list. This opens the image in MMNav.
Click the Maps / Calibration menu command.

Idenify one of your calibration points, zoom in and carefully click on it on the map. At each click, the X,Y coordinates are put in the top line of the dialog.
Enter the position in the large edit box to the left of the X and Y coordinates. Use the position format selected in the Mode menu (lat/long or grid coordinates). When entering lat and long:
You can use a 'd' or a ':' in place of the degrees symbol
You don't have to enter zeros for the minutes or seconds, eg you can just enter "40N, 120W" instead of "40:00.000'N, 120:00.000'W". The comma is important.
Click the Save point button (or press Enter). The point you clicked is indicated on the map.
Repeat for each of your reference points.
Once you have entered three points, the map is calibrated, and the cursor position is shown in the status indicator at the bottom right of the screen. Now, when you click on the map, the computed geographic position is entered in the dialog. You can edit this position instead of entering it from scratch. Each time you Save a point, the calibration is re-computed.
If you make a mistake, select the bad point in the calibration points list, edit the position or the coordinates, and click the Save point button. Or you can click Delete to remove a point completely.
If the map has printed lines of latitude and longitude, the lat/long grid mode can make calibration easier. Enable the Lat/Long Grid checkbox and enter the spacing of the grid in degrees and/or minutes. When the lat/long grid is enabled:
Grid lines are drawn on the map, allowing you to gauge the accuracy of the calibration. Look for distortion between calibration points and add new points to anchor the grid into position.
The computed click position is rounded to the nearest grid intersection. Provided the existing calibration is sufficiently accurate, you no longer have to edit the position when you click on a grid intersection.
If the Calibration command is greyed, click Maps, select the map you are viewing, and click Edit. Enable the Allow Calibration checkbox.
When you click OK in the calibration dialog, a file with the JPR extension is written into the folder containing the original image file. You can now edit the image file with a graphics editor, and when you next open the map in MMNav, it will re-imort the modified image, without losing your calibration.
If you click Cancel, the map is put back to it's original state when you opened the calibration dialog.
Once the map is calibrated, you can add a boundary. The boundary is used for the "Maps at cursor" feature, and for automatically changing maps as you move off the edge.
To define a boundary, create a Route around the edge of the map. (Click the Route toolbar button, then click once at each corner of the map. Click on the first corner again to close the route). You can scroll the map while creating a route using the middle mouse button (or wheel), or by holding down the shift key while you drag the map. You can use any number of points to define a complex boundary shape.
Once you have created a route around the map, make sure the route is selected (click on the route, so it is shown in red, not blue). Then click the Map / Boundary from Route menu command.
To edit an existing boundary, click the Map / Route from Boundary menu command. You can drag, insert or delete waypoints, just like editing a normal route.
If you can't see the boundary, make sure Map / Show map outlines is enabled.