 ,
and select Arrange. You can then
drag or re-size data items with your finger. Items that you cover up when
you re-position or re-size an item are automatically moved out of the
way, and re-positioned if they will fit.
,
and select Arrange. You can then
drag or re-size data items with your finger. Items that you cover up when
you re-position or re-size an item are automatically moved out of the
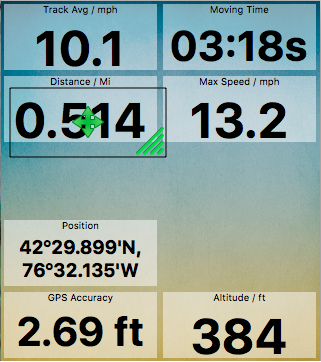
way, and re-positioned if they will fit.The app is capable of displaying a great variety of navigation information, and many people will want to customize the displays to enhance the data that is relevant to their style of using the app. Some people just want to record their trip, and see the distance travelled, while others want to know, for example, velocity-made-good as they are navigating towards a mark.
There are data fields on the main screen and on the flip-side screen, and each of these has an independent layout setting for portrait and landscape display modes. So that is 4 separate screens of information that you can customize. The default layout selects trip-recorder-related data in portrait mode and navigation-related data in landscape mode.
If you want to change any of the data fields, touch-and-hold the item on the flip-side screen, and select "Change Data" from the menu. Select the data item you want to display from a wide range of categories (See Details).
To re-arrange the data items, tap the Arrange button,
and select Arrange. You can then
drag or re-size data items with your finger. Items that you cover up when
you re-position or re-size an item are automatically moved out of the
way, and re-positioned if they will fit.
If you want to adjust the number of rows or columns of data items, you can do that with the Arrange button on the toolbar.
When you have finished customizing the layout, tap the Arrange button on the toolbar again and select "Done arranging".
To customize the data on the main screen, overlaid on the map, go to the flip side and enable Arrange mode to start customizing, then flip back to the main screen. You will see blue menu buttons, controlling items down each side of the display, and you can use these to select the data item. You cannot move or resize items on the main screen. To disable an item on the main screen, select Other > Blank.
When you are happy with your customized layout, I recommend saving it to a file. Tap the Arrange button flip side, then select Save Layout. If you make a mistake and want to go back to the default, select Restore Default Layout, or you can load one of your saved layouts. You could set up one layout optimized for hiking, and another set up for sailing, or whatever. In the Save Layout dialog, there is a button to Share the layout as an attachment, so you can send it over to your buddy's iPhone. These files (which have the .dvtf extension) can also be used in the Mac and Android apps.
Next: Locking the Screen