Map Controls loading and display of the maps and charts
Overlay Controls data such as marks, routes and tracks, displayed as an overlay on the map.
GPS Controls position input and data import/export
Search: Lookup geographic feature names in the index
Mode Controls various cursor and display modes
Web Various online tools.
Help Displays online help and license information
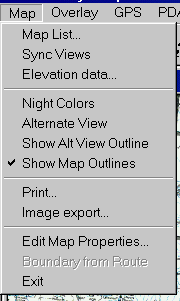
Map List: View a new map, selecting from all maps in the Map List dialog.
Sync Views: Synchronize all the map windows, so as you scroll one window, all windows scroll to show the same geographic area. If only one window is open when you click this, a second window is created. This is useful when you are using aerial photo maps, as it makes it easier to correlate the map with the photo.
Elevation Data: When you load a map, the corresponding elevation data file is automatically loaded (if there is one). However sometimes you need to load a different file explicitly. This menu command allows you to do that. Elevation data has to be in the proprietary "QED" file format. To obtain elevation data, contact Memory-Map. No import or conversion tools are available.
Night colors: Selects a red color palette that helps to preserve your night vision (it is suggested that you also reduce the brightness of the display).
Alternate View: Toggles between two different views of the map. You can scroll and zoom independently in each view. When a zoomed out view is displayed, the outline of the other view is displayed in blue.
Alt View outline: When checked, the outline of the alternate view is shown as a blue rectangle. The outline is only shown when the alternate view is zoomed in more than the curent view.
Show Map Outlines: This command toggles the display of the outlines of all available maps and charts.
Print: Print the map. See Printing.
Image Export: Export the area of the map in the current map window as a BMP bitmap file. The full resolution of the map can be exported, even when the window is zoomed out. Relief shading can be included. (NB: some map publishers do not permit their maps to be exported, so you may find this feature is disabled).
Edit Map Properties: Shows a dialog that allows you to change the name of the map, and a variety of other attributes.
Default Map Projection: When you import map images, and you have calibration information in a TFW or JPW file, you can set the projection information here. This does not alter the appearance of maps on the screen, it only affects the calibration of maps where the projection information is not specified in another way.
Calibration: Allows you to calibrate the map, so the software can associate geographic coordinates with the position on the screen. Maps supplied commercially are usually pre-calibrated, and this option is greyed out. If you want to enable it, click Edit Map Properties and enable the "Allow Calibration" checkbox. Click here for more details.
Boundary from Route, Route from Boundary: Part of the map calibration process is to define the outline boundary of the map. Click here for more details.
Exit: Closes the Memory-Map Navigator application.
Create New: Create a new Route, or a new Mark.
 Properties: Opens the properties dialog that allows you to browse and edit overlay objects.
Import: Reads overlay data from an mmo file or from various third-party formats, adding to the current set of overlay objects. See here for details of the various text file data formats.
Export All: Writes all objects to an mmo file or other format.
Export Visible: Writes only objects that have the "visible" check-box set in the object properties.
Icons: Allows you to manage user-defined waypoint symbols. See here...
Send Email: The currently selected object is written to an mmo file and attached to a new message in your email software. The recipient will need to use Memory-Map Navigator to view the data.
Show All: Allows you to make all objects visible (ie, not hidden). This just changes the property of the overlay object. It does not scroll or zoom the display to bring objects into view.
Hide All: All objects are made invisible. You can get them back by doing a Show All, or by browsing them in the Overlay Properties dialog and setting the Visible check-box.
Show All/Hide All > Matching: Allows you to show or hide overlays that match a text pattern in their name and/or category.
Delete Hidden: Delete all objects that have the Visible checkbox cleared in the overlay properties dialog.
Delete All: Deletes all overlay objects
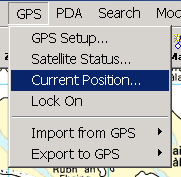 GPS setup: Open the GPS Setup Dialog to select the type of GPS (or other positioning device) and the communication parameters.
Satellite Status: Opens a small window showing a bar graph of satellite signal strength. Available only in NMEA mode. Use this if you are using a "puck" style GPS that does not have it's own display.
Current Position: Opens a small window showing the time, current position, altitude, course and speed. If the position is not available, the GPS status message is displayed.
Lock onto GPS: When this command is checked, the current position is shown at the center of the screen, and the map is scrolled automatically to keep it there. This is sometimes referred to as a moving map. If the position is outside the current map, another map is automatically opened. If you want to view more of the map ahead, simply drag the map to place the current position near the edge. As long as you are locked on, the current position will remain where you dragged it.
Import from GPS: Reads all waypoints, routes or the recorded track information from the GPS to the computer.
Export to GPS: Sends all "visible" marks, routes or tracks to the GPS. This will replace existing data on the GPS. Use the Overlay > Hide All / Show all commands, together with the visible checkbox in the overlay properties window to control which objects are sent. To send just one specific mark or route to the GPS, you can right-click on the object and select "Send to GPS".
Find Place. Search for a feature by entering its name and/or category, and display it on the map. This command also allows you to display a location by entering its coordinates. More details.
Load database: Load the geographic name database from an external file. If a PDA is connected to the system, the database is copied to the PDA. For details click here.
Continuous scroll: When scrolling, keep the cursor stationary for easier use with laptop and trackball pointing devices.
Units: Allows you to select Nautical, Statute or Metric units for data displays. Also allows you to set the magnetic variation for bearing displays.
Position Format: Allows you to select the Lat/Long or grid position display format.
Toolbar Layout: Allows you to customize the toolbar button layout. Two independent layouts are saved: "Planning" and "Navigation".
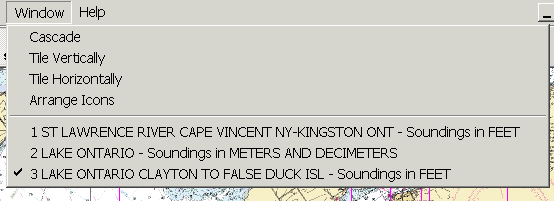
Memory-Map Navigator allows you to view multiple map windows. The windows are controlled using the standard window commands:
Cascade: Arrange the windows is a diagonal pattern so you can see the title bar of each window
Tile Vertically: Arrange the windows side-by-side.
Tile Horizontally: Arrange the windows on top of one another.
Arrange Icons: Minimized windows are moved to the bottom left of the screen.
The menu shows the names of map windows that are open. Selecting a map activates that window.
View Online Satellite Photo: Shows the Google Earth view of the current map window in a browser window
View Cloud Sync Data: Shows a list of the overlay data synced between Memory-Map and your supported mobile devices
Check for Updates: Takes you to a web page to see if there is a newer version of the software available.
Technical Support: View our tech support page on the web. This contains an interactive knowledgebase and a form to ask questions.
Memory-Map Home Page: Visit us occasionally to see what's new!
Help Topics: Opens this help system at the Table of Contents.
Help Index: Opens this help system at the Index.
License Management: Allows you to see which licenses have been activated on this computer. See License Management
About: Displays version, copyright and license information.